

Keystroke Macro is a MacroMenu Item
type, there can performs keyboard simulation by executing key codes combined
with regular pasted text, this means you can perform very complex tasks without
having to type a huge amount of keystrokes flawlessly.
When a
Keystroke Macro is executed the script is send as a long line of
code to the interpreter, that chops it into lines of keystrokes, these lines are
then send to the system as series of keystrokes and the system then pass them on
to the window that have the keyboard focus as if you were typing them on the
keyboard.
The syntax in a Keystroke Macro is quite simple even though it can appear complicated and I will explain it at the end of this page. For now I will only say that the backslash is a reserved character and if you need one in the final result you will have to escape it with an extra backslash, in other words if you want one backslash \ you must use two \\.
One important thing to be aware of when making
Keystroke Macros and that is auto completion because that can steel the
new line key strokes (Enter) or what ever key there is used to accept the
suggested word. I have found that ending lines with . dot or : semicolon or
sending an escape (esc) key usually make the dialog go away before the
newline stroke.
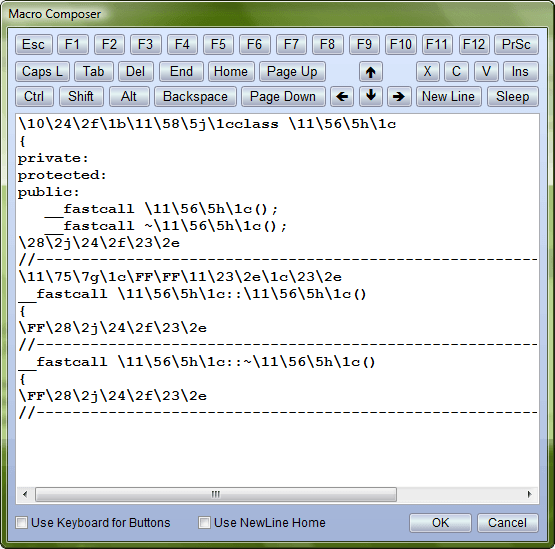
As you can see, there are a lot of buttons at the top, that correspond with the
most used keys, on a standard keyboard. This is so you don't have to remember all
the key values. Instead you can just click the buttons that represent the keys
you need and their value will be written to the script at cursor position.
Ctrl, Shift,
Alt & Caps L works different from the rest of the buttons, as they stay
down after one click and come up again after the second click. It is made this
way so you with mouse clicks on buttons can simulate Ctrl + V
which in keystrokes are, Ctrl Down, V Down, V Up
and Ctrl Up.
Maybe when looking at the macro in the editor
at the left, you think: That's gonna be a lot of clicking, but fear not, because
if you look down in the left corner of the composer you can see a checkbox
saying Use Keyboard for Buttons.
If you check that box you
can simply just use your keyboard, and instead of writing normally in the editor,
every keystroke will be translated to the corresponding key code. But beware if
you write an error you need to uncheck the box, before you can use delete or back
space for deleting.
Use NewLine Home is the other checkbox
there at the bottom, if that box is checked every time there is a line break
there will automatically be added a Home Keystroke to
make sure that the next line starts all to the left. This feature is very useful
if you have an editor with auto indent. If you don't use auto indent you never
need to check that box.
The macro you see above is one of the more complex
ones and it can from just a single name create a full C++ class with correct
named CTor and DTor in the h file, then jump to the cpp file, where it writes
the body of the CTor and DTor. that is if you run it against a C++Builder
editor.
It's a good idea to have a good knowledge of of all the shortcuts
there can be used in your editor, such knowledge will make it a lot easier to
construct useful keystroke macros.
Lets start with a very simple for loop macro for our editor with auto indent:
for( int i = 0; i < C; ++i )
{
}\24\2f\26\2h\26\2h\09\0k
The above macro will produce this result if started 4 tabs (12 spaces) in from the left:
for( int i = 0; i < C; ++i )
{
|
}
This line: \24\2f\26\2h\26\2h\09\0k is equal to
Home, Up Arrow, Up Arrow and a Tab
So that the cursor will end up where the vertical
line is.
Lets make it a bit more difficult.
int SaveToFile( String fileName );
We have the above line of code and we want it to end up looking like this:
int TClassName::SaveToFile( String fileName )
{
}
//------------------------------------------------------------------------
First we notice that the TClassName is not anywhere in the
source line, so we need to write in our help text that class name must be copied
to the clipboard. We also need to write that the cursor should be positioned at
the right side of int.
First we need to select the space
between int and SaveToFile, in my editor I can do Ctrl +
Shift
+ Arrow Right but in some editors you will need an additional
Arrow Left. Wen the space is selected we type a space and do
Ctrl + V to paste
the class name and then type the two colons. Then we do a Home and
again a Ctrl + Shift + Arrow Right, to select
the space before the int. Delete the selection
and do an End hit Backspace to delete the
; folowed by a new line and the rest is just
character typing. Then we end up with this code:
\11\10\27\2i\1b\1c \11\56\5h\1c::\24\2f\11\10\27\2i\1b\1c\2E\2w\23\2e\08\0j
{
}
//---------------------------------------------------------------------------
In the Clipboard Modifier there is a function for sending keystrokes SendKeyboardCombinaton( 'Macro' ) the format that you must use for the Macro part of this function, is the same as the one used in Keystroke Macros, so you can use the Keystroke Macro Composer to create the Keystroke Strings that you need.
In the Keystroke Macros there are three and a half types of characters, the first and the
simplest are just plain Unicode characters, anything you can write in a simple
editor like notepad, will do just fine in that category. These characters will
be transferred, to the window that has the keyboard focus, as they are and they
will not be affected by any of the special characters.
The second type are
those that simulate keyboard keystrokes and they all contains a
down code and an up code. These up and down code are build the same way they all start
with a backslash \ followed by a two digits hex value representing the keys
value in the virtual key
key table. To
distinguish up values from down values the second digit in the up hex value is lifted
by 50 in the ascii table. This means that if you view the down and up values in
a schematic way like this: \XX\XY then all the X values must be from this set:
0123456789ABCDEF and all the Y values must be from this set:
bcdefghijkstuvwx. Lets take an example
Shift have a hex value of 10, so the down value will
be \10 and the up value will be \1b. Lets take
one more Del Down will be \2E and Del
Up will be \2w and them both together \2E\2w.
The third type is a four digits hex value that start with \!
followed by the four hex digits \!03DF the hex digits must be
found in the first group of the two that can be seen above.
I have added
this type, so it is possible to generate characters, that can't be typed on the
keyboard. You can find such four digits hex values if you start the Windows
Charmap.exe program, they can be found in the lower left corner
of the program ( minus the U+ ).
And now for the half type, which is the
Sleep button \FF, this is of course not a
keyboard key, so there is no need for an up value, that's why I called it a half
type. The \FF in the macro give you a sleep / pause of 0.1
second when the \FF is reached, before the script continue, if
you need a longer break you just place more then one \FF in the
script.


![]()
Last updated: Jun-28-2022 © Copyright 2003-2022 Asger-P Software
This kind of program goes by many names: ini editor, ini edit, password generator, password organizer, password saver.