

QLaunch, Quick Launch, QuickPad, LaunchPad, Dock, Dockbar or what ever you want to call this great program, is a very easy to use and very efficient toolbar, for launching your favorite programs, documents, folders or websites. Clean up your desktop, get rid of all those icons, put them on a QLaunch toolbar instead and increase your productivity. Get one-click access to ALL your favorite programs. QLaunch can stick or dock to all the edges of your screen, like you see above, Quick Launch have auto hide so you only see it when you want to. QLaunch is designed for Vista and Windows 7 with full Aero style, but it can run on all Windows versions from XP onwords.
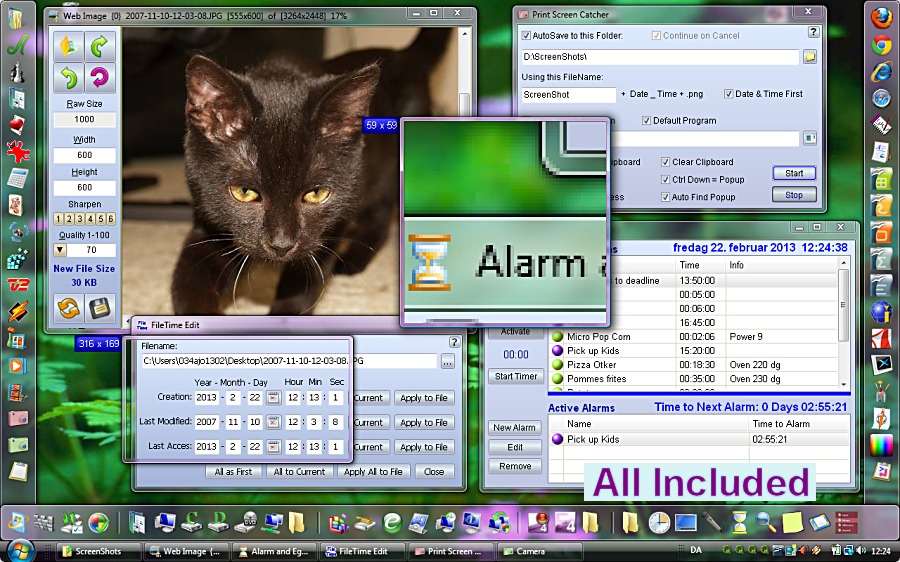
This new version comes with tools included!

The new tools cover a very diverse set of tasks: Alarm / egg / stop watch, Alphabetizer, Break Lines, Screen Camera, Clean Clipboard, File Template, File Time Changer, Icon To Png, Icon Viewer, Image or images To Icon with batch conversion, Folder Menu, Magnifying Glass, Hide All, Print Screen Catcher, Sticker and Web Image (preview, resize, sharpen, crop and compress).
Check out all the new tool at:
Qlaunch Tools 1 and
Qlaunch Tools 2
If you are the kind of person, that like to have quick access, to your programs and websites and if you like toolbars with images better then menus with text, you simply must try QLaunch.
Quick Launch can stick to all the edges of your screen, there can even be three different toolbars on every edge and up to four on one screen edge, each toolbar using a different part of the screen edge for activation. The QLaunch toolbar can of course be set to auto hide, so that it only is visible when activated. You add programs to the toolbar simply by dropping them on to the toolbar. For more detailed information on how to use QLaunch, see the user guide below.
QLaunch is Trial Ware, so you have 30 days to try it before you decide to buy it. Price is: 15 USD
Current version: 2.7.3.38.


Watch beginners tutorial on YouTube
This dialog below is the first you will see after installing QLaunch and starting it for the
first time. It is also what you will see if you click the New Toolbar menu
item, in the popup menu:

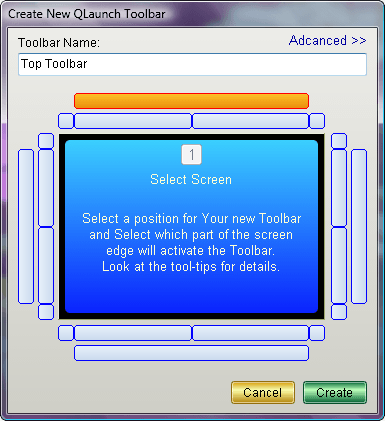
Toolbar Name:
The name you write here will be used in the tool tip on the Taskbar to identify
the toolbar and it will also be used in the filename used by QLaunch to store
the toolbar data.
Note: If the Create button stays disabled you have written a name that is
already used.
After setting the name you select on which edge of the
screen you want the toolbar to be positioned and at the same time you select
which part of that edge that will activate the toolbar.
There are five different options for activation on each edge: All the way minus
corners, first corner, first half minus corner, last half minus corner and last
corner. No matter which you select the toolbar will always go all the way.
The one selected in the picture will give a toolbar all the way at the top edge
of your screen and it will be activated when you move the mouse to the top edge.
If you have more then one screen there will be more then one button over "Select
Screen" and you should choose on which screen you want the toolbar,
all this can of course be changed after the toolbar is created.
At the top right there is a label saying "Advanced >>" if you
click that you will get some extra options regarding file locations and where to
create shortcuts for more information see the
Advanced User Guide.
By default, QLaunch will store all relevant data in a subfolder to:
UserName\AppData\Roaming which is the place where Microsoft suggest Application
data should be stored, and QLaunch will create a shortcut in the Start folder so that
QLaunch will start automatically when you log on.
At last click the create button.
Now you have an empty QLaunch toolbar that looks something like this.
![]()
You can drop shortcuts, programs, folders and files on to the toolbar, just drop them to an empty part of the toolbar and they will automatically be added after the last button.
You can move Buttons by holding down the Ctrl key and then drag the button to its new position with the mouse.

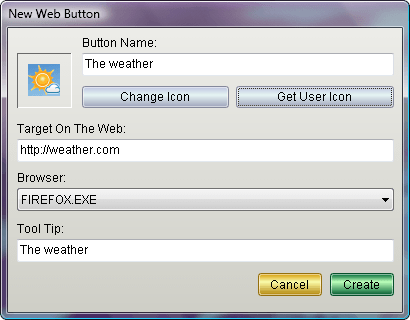
If you click this Item you will get the dialog you see on
the right.
Button Name:
Is the name used to identify the button.
The Icon:
Is auto selected, but can be changed by clicking one of the two button to the
right of the icon. The first button will let you choose from the icons
associated with the Browser. The second button will remember its path, so if you
have a folder full of icons that's the button you should use.
Target on the Web:
Is the address of the website you want the button to open.
Browser:
Here you select the Browser you want to open the site.
Tool Tip:
Is for a short description of the site you can create line breaks by inserting a
vertical line like this one: |

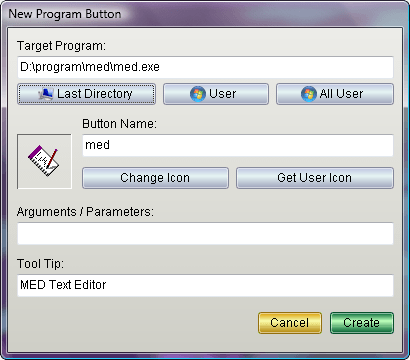
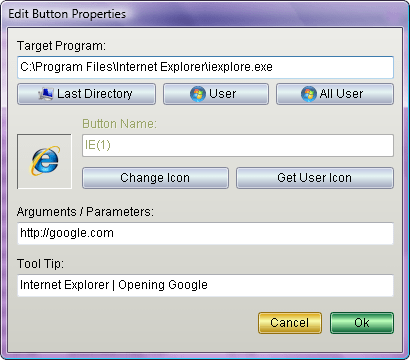
If you click this Item you will get the dialog you see on
the right.
Target Program:
Is for the full path and filename to the program, file or shortcut, you want to
start when the button is clicked. you can use one of the three buttons to browse
for your target. the first button will take you to the directory where you last
found a target. The second will take you to the per user part of the start menu
and the third button will take you to the all user part of the start menu.
Button Name and Tool Tip: Is the same as above.
Arguments / Parameters:
This field is optional and is used to send information to the program on the
command line.

If you click this Item you will get this dialog.
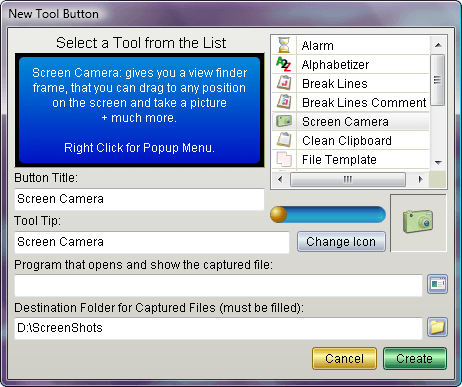
This is where you choose which of the new Tool functions
buttons, you want to add to your QLaunch.
You select the tool in the list at the right after that you set
the name and the Tool tip as you want. You can change the color of the
predefined icon by dragging the little ball in the blue slider or you can change
the icon by clicking the change icon button.
What you see below the Tool Tip will vary from tool to tool
depending what is needed to get started.
Some of the tools ends their description with a line that say: "Right Click for
Popup Menu". This means that, when you start that program you can right click in
that program and get extra options and function,
You can see a lot more about these tools on their help page. QLaunch Tools.

If you click this Item you will get the dialog you see on
the right.
This dialog is a combination of the two dialogs above, in other words it is the
same dialog you get for both kind of buttons.
The button properties you see in the dialog at the right is for a Web button.
The target program is therefore the browser and the webpage to be opened, is in
the Arguments / Parameters field.
If you have a look at the Tool Tip field you can see how I used a vertical line
| in the middle of the text, this will give me two lines in the Tool Tip for the
button.
Note: If you hold down Ctrl when you click the Button Properties menu, you
will get the standard windows property dialog where you can modify properties
like compatibility and security.

Clicking this menu item will open the folder where the target program or file is stored. This menu will only be visible if you right-clicked on a button.

This menu item will create a separator in the toolbar where you right-clicked to open the menu, a separator is a half size button with a line in the middle.

If you click this Menu Item you will delete the button or space there was under the mouse when you right-clicked, you will be asked if you want to delete the button or space. To avoid the extra question you can hold down the Shift key while you click this menu item.

When this menu item is checked the toolbar will become invisible when another window on you computer gets activated, in other words toolbar will hide it self when it get deactivated. You make the toolbar visible again by moving the mouse to the part the screen edge you have chosen for activation. The toolbar will not get activated unless you click on it and it will hide again if you move the mouse away from the toolbar.

This setting will make the toolbar come to the surface when you move the mouse to the activation part of the screen edge. The toolbar will not get activated unless you click it with the mouse and it will not go away again by it self either if you don't click it. That is because it is not possible to move a windows down in the Z-order one can only move it up.

Unchecking this setting will hide the small Tool Tips that pups up when you hover the mouse over a button.


Flat Style or Button Style that is up to you, in the image at the right you see a button with Flat Style at the left and a button with Button Style on the right. Note that these styles are only visible when you hover the mouse over a button.

Selecting this option will make a button appear on the taskbar, just like any other program that you start.

Image Size, refer to the size of the image on each button. you
get four options in a submenu when you click this menu item: 24 x 24, 32 x 32,
40 x 40 and 48 x 48.
I recommend 24 x 24 or 32 x 32. The reason for that is, that not nearly all
program have icons larger then 32 pixels and if they don't have the larger icons
the images on the buttons will look ugly. Keyboard shortcuts are: Shift+1, 2, 3
or 4.

This menu item will only bee visible if you have more then one screen connected to you computer and it will then have a submenu for each screen you have, so you can chose which screen you want the toolbar to appear on.

Here you will get four options: Left Edge, Top Edge, Right Edge
and Bottom Edge. Click the menu item where you want the toolbar to appear.
Keyboard shortcuts are: Ctrl+1, 2, 3 or 4.

There are five different activation types: First Corner, First Half, Second Half,
Second Corner and Full Length.
The first four options are to be understood clockwise.
| First Corner: | Represent a small rectangle 10 x 10´pixels in the first corner of the screen edge, if you select this option a toolbar positioned at the top of the screen will be activated if you move the mouse to the top left corner of the screen. Keyboard shortcut: Ctrl+Shift+1 | |
| First Half: | First half of a toolbar at the screen top edge is the same as the left half. This is minus the first 10 pixels. Keyboard shortcut: Ctrl+Shift+2 | |
| Second Half: | Again think clockwise, this one is the same as the right half of a toolbar at the top of the screen, minus the last 10 pixels in the corner. Keyboard shortcut: Ctrl+Shift+3 | |
| Second Corner: | Represent a small rectangle 10 x 10 pixels in last corner of the screen edge where you have the toolbar. Keyboard shortcut: Ctrl+Shift+4 | |
| Full Length: | This option will make the toolbar show when the mouse is moved to any position along the edge where the toolbar is, except for 10 pixels at both ends. Keyboard shortcut: Ctrl+Shift+5 |
These activation type settings, are the reason you can have up to four toolbars at the same edge of your screen. In Toolbar 1 you set activation type to First Corner. In Toolbar 2 you set activation type to First Half. In Toolbar 3 you set activation type to Last Half and finally in Toolbar 4 you set activation type to Last Corner. Set all four toolbars to Auto Hide. Now you will get a different toolbar depending on which part of the edge you hit with the mouse.

Open the folder where all the .Lnk files, that make up the buttons, are stored.
If you click this menu item you get to the create new toolbar dialog, as described at the beginning of this user guide

Save all information's about the toolbar, to its QlXml file, this is done automatically when the program closes, but if you have done a lot of changes to your toolbar, it can be a good idea to save manually, should there be a power failure or some other computer shut down.

Like above, but you the opportunity to save the information to a new file location, this will not change where the QLaunch automatically store its settings.

Delete all files associated with the toolbar and closes the toolbar. Before the files are deleted you will be shown a message box containing the name of the folder and the files that is going to be deleted, if you click the Yes button in that message box.

Closes the toolbar and save any changes.

Will take you to this site.

Will open a dialog with a little information about the program and if QLaunch is registered you can also se to whom it's registered in this dialog.

Closes the popup menu, as does the Esc key .

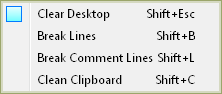
Gives you the submenu you see to the right. These four menu items each call one of the new tool functions. Clean Clipboard and Minimize all windows work the same as if you use the tool button where as the two Break line functions defaults to a line length of 65 characters. You can find more about how these functions work on the QLaunch Tools page.

Sometimes you want a proper explanation to what a button does, in such cases the Tool Tip will normally get very long, but not in QLaunch. In QLaunch you have the option to put in line-breaks in the Tool Tip and you do that by inserting a vertical line like this one | . Just insert | when ever you want the text to start on a new line just like this: "Internet Explorer | Opening Google". This is the text line needed to produce the Tool Tip you see at the beginning of this paragraph.
Upgrading is very, very easy. Simply download the newest version of QLaunch from this website and run it on Your computer. You don't even have to close down any of the toolbars that you have running, they will be closed automatically and then restarted again when the installation is done. That is if you leave the option to start QLaunch checked, at the end of the installation.
QLaunch comes with full uninstall, this means that when You run the uninstaller you will be presented with a window containing all the files and folder, that was created during your use of the toolbar. If you want to keep some of these files, you simply uncheck the files or folder you want to keep and then click Delete Selected. If you don't want to keep any, simply click Delete All instead.
-I
Is mandatory and must be followed directly (no space) by a full path and file name to a QlXml file, QlXml is the file extension for a QLaunch data file.
-M
Can be used to avoid users having access to the popup menu.
-R
Makes QLaunch run in read only mode. If this option is specified without the -M option, then the user can make changes to the toolbar, but the changes will not be saved.
The last two options is added to make it possible to use the QLaunch toolbar at schools, to give quick access to the schools default programs.
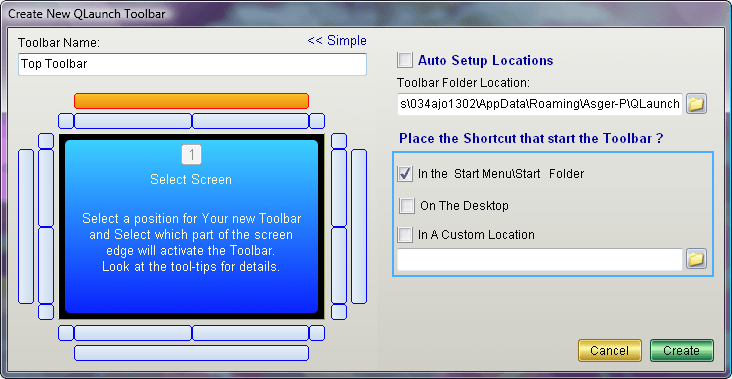
When 'Auto Setup Location' is not checked you get the opportunity to specify
the path for QLaunch data folder, data file and shortcut. In the example used
here the will be created three files and one folder with these name:
D:\Toolbars\NewToolbar
D:\Toolbars\NewToolbar.QlXml
D:\Toolbars\NewToolbar.lnk
%USERPROFILE%\StartMenu\Programs\StartUp\NewToolbar.lnk

|

|

|
|

|

|

|
|

|

|

|


![]()
Last updated: Jun-28-2022 © Copyright 2003-2022 Asger-P Software
This kind of tollbar goes by many names: QuickLaunch, Launcher, Quick Launch, Smart Launch, Quick Start, Q-Launch QuickStart QuickBar SmartLaunch LaunchBar LaunchPad, Dockbar, Dock bar, Dockpad etc.