
Here is an alphabetic list of the tools that comes with QLaunch and below the
list there is description and help to each tool. How to add the tool buttons to
QLaunch is described on the QLaunch page.
The help below is not organized alphabetic, but after how much I personally use
each tool and when they were created. The images to the left of each item in the list are links to the right help and the same
goes for the Learn more link at the end of each items text.
The alphabetic list of tools is the same on both the Qlaunch Tools 1 and 2 page, but
the explanation below the list is different, Qlaunch Tools 2 contains the latest
tools added.
Alarm: Is a Simple Alarm Clock or an advanced Kitchen Timer. That can give you daily alarms, count downs alarms or measure time like a stop watch. Learn more.
Alphabetizer A2Z: Is a program that can take a piece of text and then sort all the words or just the lines alphabetically. Learn more.
Break Lines: Break all the text lines in the clipboard, at a word separator closest to 65 characters or closest to the line length you have chosen. Learn more.
Break Comment Lines: Break the text lines in the clipboard, at 65 characters or at the number you choose and then it inserts a > sign in front of each line. Learn more.
Clean Clipboard: Cleans the text in the clipboard for all formatting encodings and leaves only simple text in the clipboard. Learn more.
File Template: File Template can use any of your files as a template, for creating a new file, in a predefined location and then open it with the right program. Learn more.
File Time: File Time can change creation time, modification time and last access time or all on any writeable file on your computer. Learn more.
Folder Menu: Folder Menu can give you a view of a folder in a drop down menu, what is shown in the drop down menu can be filtered and sorted in many different ways. Learn more.
Icon To Pngs: Icon To Png Files. Let you extract all or just selected images from any icon and save them as 32bit Png files, with just a few clicks. Learn more.
Image(s) To Icons(s): Image(s) To Icons(s) Let you convert image(s) to icons, just by dropping on the app or button. The resulting icon can contain as many as 10 different image sizes. Learn more.
Magnify and Pick: Magnify and Pick can magnify any part of your screen up to 48 times the normal size. It can pick the color value of any pixel and it can click any point. Learn more.
Minimize All: Minimize all open windows that can be minimized, leaving you with a clean and unobstructed view to the desktop.
Picture: Picture, is a simple tool for showing one picture in the size and at the position according to your whishes. Learn more.
Print Screen Catcher: Print Screen Catcher, works in combination with the keyboards Print Screen key, by monitoring the system and save any catched images to png files. Learn more.
Screen Camera: Screen Camera gives you a view finder frame, that you can drag to any position on the screen and take a picture + much more. Learn more.
Sticker: Sticker, helps you take notes with the smallest effort possible, Click write and return to your work. No need to concern about saving or closing. Learn more.
Web Image: Is a small program that will help you resize Crop and Compress you digital images so that they are more suitable for use in mails and on the internet. Learn more.
![]() View the Qlaunch Quick Tour Video
View the Qlaunch Quick Tour Video
![]()
 |
 |

|
 |
 |
 |
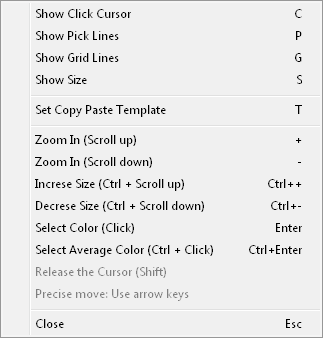
When you click on a Magnify and Pick buttons on your QLaunch, your
cursor becomes a magnifying glass, to go back to normal cursor just hit the escape
key or left click.
Magnify and Pick is more then just a magnifying glass, it is also capable of
clicking at one specific pixel and it can also grab the color of a specific pixel
or give you the average color of all the pixels you have in the frame.
The first image shows Magnify and Pick as it is when you start it,
with double size contents. The actual size of the Magnify and Pick
window can be different though, it remember the size from last run.
In the second image
![]() and
and ![]() are active. The blue size tag will always show an uneven number and it will always
show the number of whole pixels shown.
are active. The blue size tag will always show an uneven number and it will always
show the number of whole pixels shown.
The third frame show
Magnify and Pick with
![]() activated, when they are active the program is ready for picking a color value. There
is a little trick you can use in in this mode, if you hold down the Shift key the
window will stop following the mouse and instead you get a little cross that you can
us for picking the right pixel.
activated, when they are active the program is ready for picking a color value. There
is a little trick you can use in in this mode, if you hold down the Shift key the
window will stop following the mouse and instead you get a little cross that you can
us for picking the right pixel.
The fourth image with
![]() active, this means that the program is ready for clicking precisely on the center pixel
of the window. And the last frame is just a maximum zoom on the first frame.
active, this means that the program is ready for clicking precisely on the center pixel
of the window. And the last frame is just a maximum zoom on the first frame.

When you use Magnify and Pick for picking colors, the value of the color
is send to the clipboard in a predefined format rgb(RR,GG,BB); where RR is the red value,
GG the green and BB the blue. This format can be changed by you if you click at
![]() When you click that menu item you will see the little dialog above. You can use
all kind of characters in the edit field, just remember that RR, GG, BB will be
replaced with their corresponding color value. The two checkboxes at the left determine
if you want decimal values or hex values.
When you click that menu item you will see the little dialog above. You can use
all kind of characters in the edit field, just remember that RR, GG, BB will be
replaced with their corresponding color value. The two checkboxes at the left determine
if you want decimal values or hex values.
Navigating Magnify and Pick: Zoom in and out is done with the
mouse wheel or with the + and - key on the numerical keyboard. If you have a
laptop without a numerical keyboard you might need to use extra keys.
Resizing the window is done in the same way as zoom, you just hold down Ctrl
while you use the mouse wheel and the + and - keys. If you need to move the
window more precisely then you can do with the mouse, you can use the arrow keys
they move the window one pixel at the time.
Screen Camera is a very versatile app for getting what you see on the screen into an image file on the disk.
Screen Camera gives you a view finder you can drag to any place on the screen, you can also resize it to any size you see fit. This camera is not limited to taking pictures of what's inside the viewfinder, it can also take pictures of the whole desktop (multiple screens), the screen that you want, the window under the viewfinder and it even have a self timer that makes it easy to snap a Popup Menu image. Please note the little blue size tag to the left of the viewfinder, this size tag always tell you the size of the viewfinder without the frame. This means that you can actually use this camera to measure parts of the screen
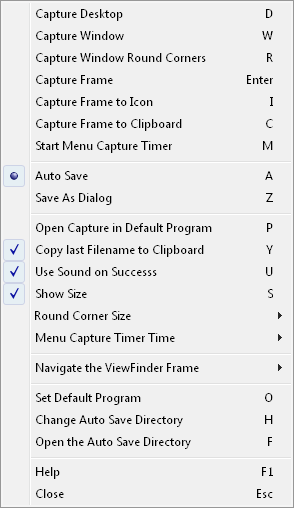
Every function in Screen Camera can be controlled from the popup menu, you see here to the right, as well as from the keyboard via keyboard shortcuts.
The first third of the menu are all the different ways to take a picture, if you only
have one monitor you will not see the first item as Desktop and Screen nr 1 are the
same. If you have more then one monitor there will be one items for each screen.
Desktop refer to the whole screen area and Screen refer to the whole monitor. If there are more then one screen
Desktop refer to all the screens in one large picture.
Please note that if you hold down the Ctrl key while you click one of the
capture items or if you hold down Ctrl while you press one of the shortcut
letters that match a capture, the program will close after making the capture.
![]() Clicking this or hitting W will create an image of the window right
beneath the center of the Screen Camera frame, the frame does not have
to fit the window in any way, it is just the point in center that counts.
Clicking this or hitting W will create an image of the window right
beneath the center of the Screen Camera frame, the frame does not have
to fit the window in any way, it is just the point in center that counts.
![]() This one works exactly as the one above, the only difference is that the final image will
have transparent round corners, like most big images on on this page.
This one works exactly as the one above, the only difference is that the final image will
have transparent round corners, like most big images on on this page.
![]() With this function you get exactly what's visible in the View Finder
frame. This together with the ability to manipulate size and position very precisely,
makes it possible to take pictures that don't need any manipulation afterwards.
Can be applied round corners.
With this function you get exactly what's visible in the View Finder
frame. This together with the ability to manipulate size and position very precisely,
makes it possible to take pictures that don't need any manipulation afterwards.
Can be applied round corners.
![]()
![]() When you click this item, Screen Camera will save what's visible
in the View Finder frame as an Icon file. The icon will contain
up to these images sizes: 256, 128, 48, 32, 16 and the 256x256 size will be PNG
compressed. If your capture size is less then 192x192, the largest image in the icon
will be 128x128. If your capture is less then 96x96 the largest image will 48x48, in other words
Screen Camera will not increase the size more then 50%
When you click this item, Screen Camera will save what's visible
in the View Finder frame as an Icon file. The icon will contain
up to these images sizes: 256, 128, 48, 32, 16 and the 256x256 size will be PNG
compressed. If your capture size is less then 192x192, the largest image in the icon
will be 128x128. If your capture is less then 96x96 the largest image will 48x48, in other words
Screen Camera will not increase the size more then 50%
If the View Finder isn't square the smallest size will be used and
the capture size will be (smallest x smallest).
If you hold down the Shift key while you use the arrow keys the frame will automatically
become a square and the same goes for holding down Ctrl + Shift while you use the
scroll wheel. Can be applied round corners.
![]()
![]() This function works like Capture Frame, but instead of saving to file, the capture is
send to the clipboard, where it can be used by other applications or by the new
QLaunch tool Images To Icon.
Can be applied round corners.
This function works like Capture Frame, but instead of saving to file, the capture is
send to the clipboard, where it can be used by other applications or by the new
QLaunch tool Images To Icon.
Can be applied round corners.
![]() This starts a timer, that after a time you have set 1 - 9 seconds, will take a picture
of what is beneath the mouse pointer. This function is great for taking pictures of
menus and popup menus. Start the timer (that hides the frame) open the menu hold the
mouse over the menu untill the picture is taken.
This starts a timer, that after a time you have set 1 - 9 seconds, will take a picture
of what is beneath the mouse pointer. This function is great for taking pictures of
menus and popup menus. Start the timer (that hides the frame) open the menu hold the
mouse over the menu untill the picture is taken.
![]()
![]() Whenever you make a capture using the frame, you can chose to get the corners rounded.
The round corners will be applied if you hold down the Shift key while
you do the capture. There is a little
submenu
Whenever you make a capture using the frame, you can chose to get the corners rounded.
The round corners will be applied if you hold down the Shift key while
you do the capture. There is a little
submenu with four different corner sizes to chose from. These sizes will be calculated as a
percent of the large image side, but the corner can not be larger then 50% of the
small side or 64 pixels.
with four different corner sizes to chose from. These sizes will be calculated as a
percent of the large image side, but the corner can not be larger then 50% of the
small side or 64 pixels.
![]() and
and
![]() Is where you decide if you want a save file dialog every time you take a picture or
you want to automatically save the file to the predefined auto save directory.
Is where you decide if you want a save file dialog every time you take a picture or
you want to automatically save the file to the predefined auto save directory.
![]() If this one is checked every time a picture is made, it is send to the default
program for opening Png files, unless you have specified your own default program,
in which case that is used instead.
If this one is checked every time a picture is made, it is send to the default
program for opening Png files, unless you have specified your own default program,
in which case that is used instead.
![]() When this one is checked the full path and filename is copied to the clipboard,
every time a picture is taken.
When this one is checked the full path and filename is copied to the clipboard,
every time a picture is taken.
![]() Check this one if you want to hear the sound of a camera shutter when you take
a picture.
Check this one if you want to hear the sound of a camera shutter when you take
a picture.
![]() Opens a
submenu
Opens a
submenu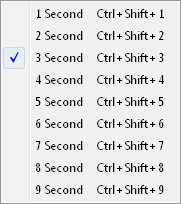 where you can chose how many seconds to wait before taking the picture after
you click
where you can chose how many seconds to wait before taking the picture after
you click
![]() or hit M on your keyboard.
or hit M on your keyboard.

![]()
![]() Checking this item will give you a little size tag, as shown here to the right, at the
left corner of the View Finder. The size tag will all the time show
you the exact width and height of the View Finder in pixels. This feature
can also be used for measuring things on the screen.
Checking this item will give you a little size tag, as shown here to the right, at the
left corner of the View Finder. The size tag will all the time show
you the exact width and height of the View Finder in pixels. This feature
can also be used for measuring things on the screen.
![]() Is also a
submenu
Is also a
submenu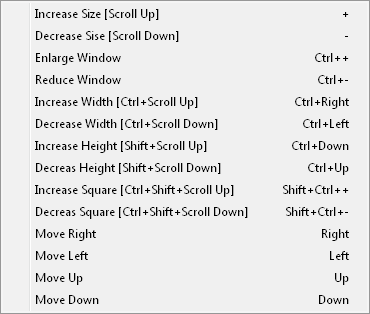 this submenu is only provided as an easy accessible way of help, It works alright, but it
is way easier to use the scroll wheel and keyboard instead of some menu items, when moving
and sizing the View Finder frame.
The shortcuts are shown here below.
this submenu is only provided as an easy accessible way of help, It works alright, but it
is way easier to use the scroll wheel and keyboard instead of some menu items, when moving
and sizing the View Finder frame.
The shortcuts are shown here below.
| Navigating Shortcuts | |
| Increase size (right and bottom) | Scroll Wheel Up or + |
| Decrease size (right and bottom) | Scroll Wheel Down or - |
| Enlarge Window (all sides) | Ctrl + + |
| Reduce Window (all sides) | Ctrl + - |
| Increase Width (right side) | Ctrl + Scroll Wheel Up or Ctrl + Right Arrow |
| Decrease Width (right side) | Ctrl + Scroll Wheel Down or Ctrl + Left Arrow |
| Increase Height (bottom) | Shift + Scroll Wheel Up or Ctrl + Down Arrow |
| Decrease Height (bottom) | Shift + Scroll Wheel Down or Ctrl + Up Arrow |
| Increase Window Square | Shift + Right Arrow or Down Arrow |
| Decrease Window Square | Shift + Left Arrow or Up Arrow |
| Increase Window Square | Ctrl + Shift + Scroll Wheel Up |
| Decrease Window Square | Ctrl + Shift + Scroll Wheel Down |
| Move Window Right | Right Arrow |
| Move Window Left | Left Arrow |
| Move Window Up | Up Arrow |
| Move Window Down | Down Arrow |
![]() When clicking this you get the opportunity to browse for an image program that
will be used to open the files after capture.
When clicking this you get the opportunity to browse for an image program that
will be used to open the files after capture.
![]() have to be checked for this to work.
have to be checked for this to work.
![]() Give you the opportunity change the directory where the image files are save
after they are captured, if not
Give you the opportunity change the directory where the image files are save
after they are captured, if not
![]() is checked, this directory is not used.
is checked, this directory is not used.
![]() Clicking this will open the folder where all the screenshots are saved, this can
also be achieved by using Ctrl + Click on the the tool button
on QLaunch.
Clicking this will open the folder where all the screenshots are saved, this can
also be achieved by using Ctrl + Click on the the tool button
on QLaunch.
NOW also available on Windows XP !
This tool works together with the Print Screen key on your keyboard and it is very efficient when writing documentation for software and other computer related matters. The reason for it's efficiency is that after you start it, it will catch every Print Screen that you do and automatically save them to png files.
When this program is activated it will monitor the system to see when you have used
the Print Screen key or the ALT + Print Screen keys.
When such activity is registered the program will catch the image and save it to
a png file.
You can open the auto save folder by holding down Ctrl while you click the tool button on QLaunch.
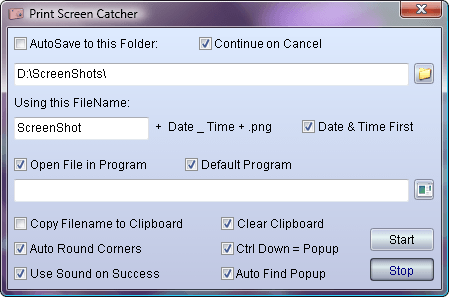
Setting up Print Screen Catcher: Starting at the top
![]() When this is checked all images are saved to the folder named in the edit below. When it
isn't checked you will be asked for a filename and location for each new image. If
When this is checked all images are saved to the folder named in the edit below. When it
isn't checked you will be asked for a filename and location for each new image. If
![]() is checked the tool will keep catching, after you cancel saving an image.
is checked the tool will keep catching, after you cancel saving an image.
In the
![]() Edit field you can write a name that will be put into all filenames when autosaving and
Edit field you can write a name that will be put into all filenames when autosaving and
![]() determine whether name or date comes first.
determine whether name or date comes first.
If
![]() is checked each image captured, is send to a image program and
is checked each image captured, is send to a image program and
![]() determine if it should be the default program for handling png files or a special program chosen by you.
determine if it should be the default program for handling png files or a special program chosen by you.
When
![]() is checked the filename of the newly created file is copied with full path to the
clipboard, so you can paste it somewhere else, if it isn't checked you can chose to
release all memory used by the clipboard if you check
is checked the filename of the newly created file is copied with full path to the
clipboard, so you can paste it somewhere else, if it isn't checked you can chose to
release all memory used by the clipboard if you check
![]()
Checking
![]() will make Print Screen Catcher check for round corners, every time you
catch a non full screen window, if round corners are found, they'll be made transparent
as you see on the images on this site.
will make Print Screen Catcher check for round corners, every time you
catch a non full screen window, if round corners are found, they'll be made transparent
as you see on the images on this site.
Popup menus can be a little tricky to catch, because they like to disappear when you
touch the keyboard, they will however stay visible when you hit the Print
Screen key and if you check
![]() Print Screen Catcher will do it's best to find the menu. There
is however a method that gets the popup menu every time. If you check the
Print Screen Catcher will do it's best to find the menu. There
is however a method that gets the popup menu every time. If you check the
![]() and you use Ctrl + Print Screen you will get the control / window there
is right beneth the mouse cursor. Ctrl + Pring Screen can of course
be used for other things then menus.
and you use Ctrl + Print Screen you will get the control / window there
is right beneth the mouse cursor. Ctrl + Pring Screen can of course
be used for other things then menus.
If
![]() is checked you will hear a camera shutter when the image is done.
is checked you will hear a camera shutter when the image is done.
Please note that if
![]() is checked and there is a not valid directory in the edit, the start button will be
disabled. Also note that when the program is started, you can not change the settings,
you have to click the stop button to enable the change of settings.
is checked and there is a not valid directory in the edit, the start button will be
disabled. Also note that when the program is started, you can not change the settings,
you have to click the stop button to enable the change of settings.
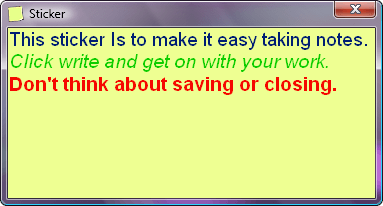
As it say on the Sticker! Have one or more of these buttons on your QLaunch,
make them in different colors and you will have a very fast and easy way of
taking notes with different themes.
This sticker have zoom just like your browser, if you hold down the Ctrl key
and use either '+' and '-' on the keyboard or the scroll wheel you can zoom
the contents of the sticker.
If you hold down shift instead of Ctrl you can increase or decrease the
Sticker window using the scroll wheel.
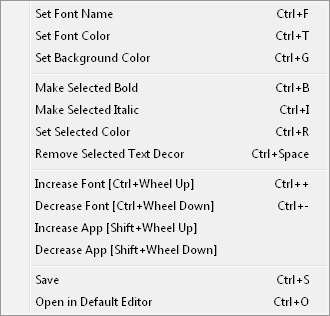
The Sticker is very flexible. As already said you can zoom the text size, but
you can also set the the font name and color for all the text and the font color
and decor for individual pieces of text. There is one thing to note though, if you set the font color
for the Sticker after you have set color on some selected text, the font color
for the Sticker will overrule the individual colors and all text will get the same
color.
Should you want to print the text you can simply use the function Open in Default Editor this wil usually open the file in WordPad and from there you can print the contents.
Folder Menu, another way of showing some or all the contents of a folder.
Folder Menu can be sorted and shown in many different ways by using the right
click popup menu you see here
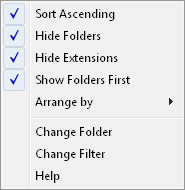 to the right.
![]() ,
,
![]() and
and
![]() don't need any explanation.
don't need any explanation.
![]() might sound a little strange to those of you where the system already
hides the extensions, but on windows almost all filenames ends with a dot (.) and a few
letters, like .txt for text files and in Folder Menu you chose if you want to
see them or not.
might sound a little strange to those of you where the system already
hides the extensions, but on windows almost all filenames ends with a dot (.) and a few
letters, like .txt for text files and in Folder Menu you chose if you want to
see them or not.
![]() is a submenu
is a submenu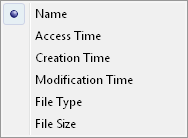 where you can chose what to sort on.
![]() gives you a dialog where you can browse the file system to find the folder you want the
menu to show.
gives you a dialog where you can browse the file system to find the folder you want the
menu to show.
![]() is the interesting one,
is the interesting one,
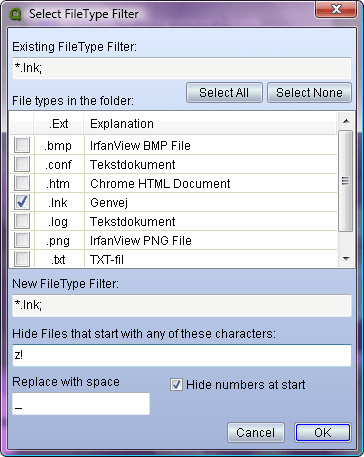 it opens the dialog you see here to the right. In this dialog you can chose
which file types the menu will show and you do that by selecting them in the list,
use double click or the space key to select and deselect.
it opens the dialog you see here to the right. In this dialog you can chose
which file types the menu will show and you do that by selecting them in the list,
use double click or the space key to select and deselect.
The Edit field below
![]() lets you hide certain files or folders that start with the characters you type
in that field, there is a 'z' and a '!' now, so no files starting with 'z' or '!'
will be shown in the menu.
lets you hide certain files or folders that start with the characters you type
in that field, there is a 'z' and a '!' now, so no files starting with 'z' or '!'
will be shown in the menu.
Characters you type in the edit below
![]() will be replaced with the space character, no matter where they appear in the
file name, except i they are the first character, in which case they will be deleted.
will be replaced with the space character, no matter where they appear in the
file name, except i they are the first character, in which case they will be deleted.
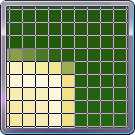
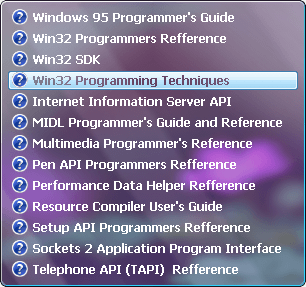
![]() Let you
write numbers at the beginning of filenames, so they will be sorted in a special
order, without showing these numbers in the final menu, that's why its possible to
make a menu as the one in the picture. There is actually numbers 01-04 in front
of the first four items, the menu just remove those numbers before showing the items.
Let you
write numbers at the beginning of filenames, so they will be sorted in a special
order, without showing these numbers in the final menu, that's why its possible to
make a menu as the one in the picture. There is actually numbers 01-04 in front
of the first four items, the menu just remove those numbers before showing the items.
Note: The Folder Menu will show maximum 300 items. That can be files or folders, the limit is due to the fact that each item shown is actually a button, so showing large numbers gets to slow.
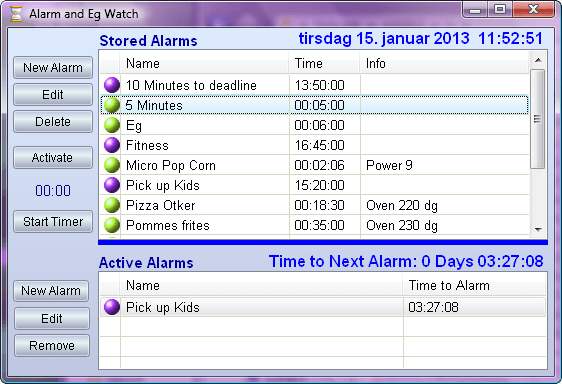
Alarm is a program for storing timed alarms. If you for instance have found the exact right amount of time your favorite pizza should have in the oven, you can store that time and activate it the next time you make pizza. You can also set up the program to give you an alarm at the same time every day or on certain days in the week.
The top list is where you keep the alarms you want to store so you can use them again and again.
The list at the bottom is where a copy of the alarm go when it is activated.
An alarm in the active list it will keep going off when time is up until it
is removed.
The Start Timer button will start the stopwatch counter. If you click the button again it will stop the timer and if you use Ctrl + Click you will get a split time and the button caption will say Resume, instead of Start Timer.
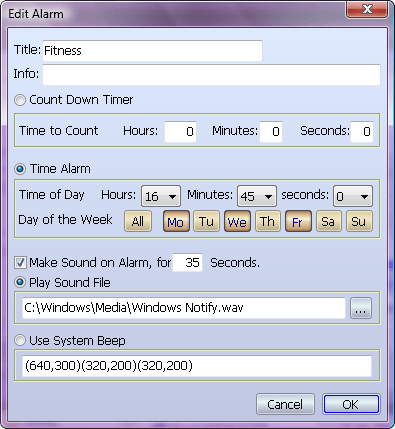
When you want to create a new alarm or edit an existing alarm you get to the dialog you see here to the right.
The first two fields are straight forward and what you type in will be what you see in the list of alarms. Next you have to chose what kind of alarm you want, you can chose either a Count Down Timer or a Time Alarm.
The Count Down Timer is an alarm just like an egg watch, set it to 20 minutes and after 20 minutes the alarm goes of. The Time Alarm is the alarm you set to 16:45 and you can also set which day(s) it should sound, you simply click the days you want to be active so they get darker.
At the bottom you chose if you want to have sound on the alarm and if so for how long. You can also chose a sound file that should be used, with the alarm, or you can compose your own series of system tones that should be played.
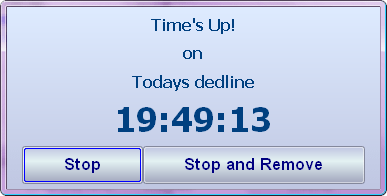
This is the window you will see when an alarm goes of, if you hit enter on that window it is the same as clicking the stop button and the alarm will stop making noise, the window will close, but the alarm will still be active and waiting for it's next time.
If you want to stop the alarm permanently you have to click the Stop and Remove button, when you do that the alarm is stopped, the window is closed and the alarm is removed from the active alarm list.
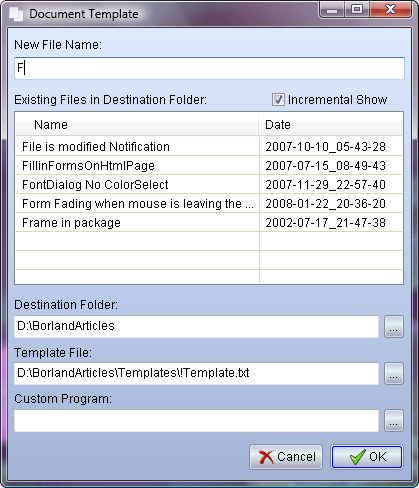
File Template is providing a uniform way of handling file templates and it is very simple to use. First of all you make sure you have a file that you want as the base / template for new files and you have a folder where you want to put the new files.
Then you make a File Template
button on your QLaunch where you provide the
![]() and the
and the
![]() Click the button and you will see a dialog very similar to the one here on the left.
Click the button and you will see a dialog very similar to the one here on the left.
If you want the new file to be opened by another program then the default, then you
need to provide the path to that program in the edit field below
![]() You can click the button with the three dots and browse for the program or you can
type in the path.
You can click the button with the three dots and browse for the program or you can
type in the path.
Now you are ready to create a file and the only thing you need to do is to
provide a filename in
![]() edit at the top.
When you type in the name, the list can behave in two ways, depending on whether or not
edit at the top.
When you type in the name, the list can behave in two ways, depending on whether or not
![]() is checked. If it is checked the list will get smaller and smaller until it is empty,
when it's you know your filename is unique. If
is checked. If it is checked the list will get smaller and smaller until it is empty,
when it's you know your filename is unique. If
![]() isn't checked the list will keep all its items and instead the
first incremental match will be selected, if there is no match the list will scroll
to the end and no item will be selected. If the filename you are typing is existing
already the Ok button will not be enabled. One last detail, if you Select a file in the list, the name
of that file will be copied to the Name field.
isn't checked the list will keep all its items and instead the
first incremental match will be selected, if there is no match the list will scroll
to the end and no item will be selected. If the filename you are typing is existing
already the Ok button will not be enabled. One last detail, if you Select a file in the list, the name
of that file will be copied to the Name field.
You can get to the Destination folder by holding down Ctrl while you click the tool button on QLaunch.
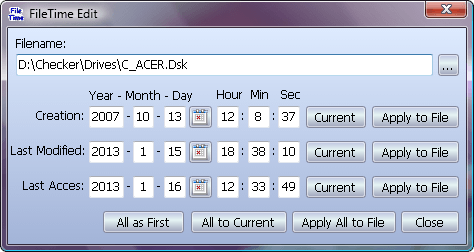
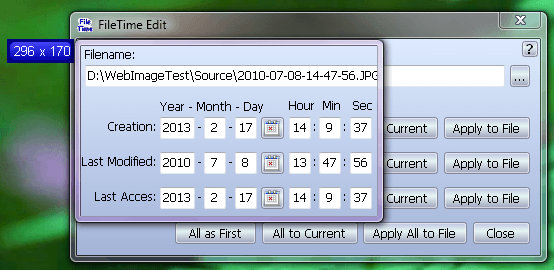
File Time can change creation time, modification time and last access time or all of them, on any writeable file on your computer.
You chose a file to work on either by dropping it on the button in QLaunch or by dropping the file on the program or finally by browsing for it.
When a new file is loaded the date and time fields are updated so they mach the file. To change the date and time of one of the fields, just correct the edit fields to the desired date and time and then click Apply to File.
Current gives you the time and date at the moment when you click the button. Each button function are explained in the tool tips of the button.
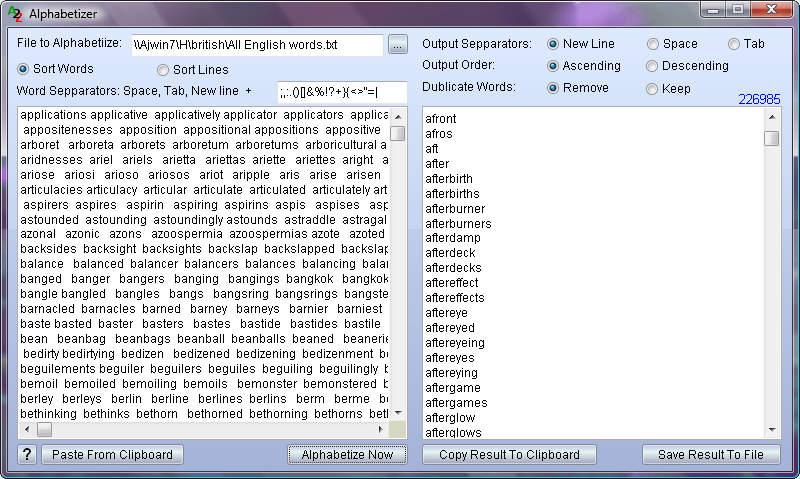
Alphabetizer A2Z can find and sort all the words or just the lines in a piece of text. You can either load the text from a file or you paste it from the clipboard. Alphabetizer can sort the output ascending or descending, it can remove duplicate words or lines and it can separate the words in three different ways, Each word on a separate line as you see above or in one long line of words where the words are separated by either a space or a tab character. If you are sorting lines, the output will again be separated by lines.
When you are done sorting you can either save the result to a text file or you can copy it to the clipboard. Alphabetizer is quite fast: 300,000 words gets alphabetized in a couple of seconds.
Alphabetizer A2Z is full unicode, but when it sort it will use the default codepage on your computer.
Break Lines And Break Comment Lines: Break the text lines in
the clipboard, at a given length. The length you set or the
default which is 65 is considered the end of the line. When the line is broken
it is broken at the word separator character that comes closest to (before
or at) the end of the line, just like a normal text editor.
The only difference between the two functions is that Break Comment Lines inserts
a > in front of each line before putting the lines back on the clipboard.
You do not need to have both of them on your QLaunch toolbar because if you
hold down control while clicking on one of them you will get the functionality
of the other. You can supply your own sound.wav file when you created the button,
if you don't like the one QLaunch use.
Clean Clipboard: CleanClipText can Clean the content of the clipboard for formatting and leave only plain text in the clipboard. You know when you copy something from the Internet or a Spreadsheet and paste it into your word processor, it very often get messy because of all the font setting that came along with the text. If you Click the Clean Clipboard button after you done a copy and before you do the paste, then you will be able to paste simple plain text. You can supply your own sound.wav file when you create the button, if you don't like the one QLaunch use.
![]()
![]()
![]()
![]()
Last Updated: Jun-28-2022 © Copyright 2003-2022 Asger-P