

MacroMenu Is a must have tool for anybody that work with text manipulation,
programming or is in the business of helping people by mail or on forums.
MacroMenu's user interface is build as a menu system that can
be customized in many different ways, setting colors, font and size. The graphic
user interface is blazing fast and have full keyboard support, this combined
with the fact that it's a menu gives you easy access to all your stored macros
and clip items. There is even a full
text incremental search, making it very easy to find what you are looking for,
even when you forgot where you put it, a couple of letters and a few milliseconds,
then you have it. You
can share menus or just branches of menus with your friends and coworkers, so
that it is easier to maintain a consistent style in your work.
When
you install the MacroMenu you get 6 different programs
all merged into one:
| ClipStore: | Store text clips and paste them into any application. |
| MacroComposer: | Build and store both simple and complicated keyboard Macros |
| ClipboardModifier: | Build and store function sets for modifying text in the clipboard |
| MailTemplate: | Store Emails and activate the emails with individual templates. |
| BookmarkMenu: | Store and open webpages in selected browser. |
| Launcher: | Store and run shortcuts for programs and files. |
MacroMenu
run on Windows XP, Vista, 7, 8 and 10.
For a full description of all the features in MacroMenu take a look at the
video and the full user
guide below.
Current version: 3.6.2.11.
Download latest MacroMenu example file.


MacroMenu is a free floating menu and it is default set to
auto-hide, this means that it will hide it self at the top of your screen until
you move the mouse pointer to the top of the screen where MacroMenu reside. You must click MacroMenu to make it
active. When MacroMenu gets activated it will remember the
program that had the focus (was active) right before MacroMenu got
activated.
Now that MacroMenu is active you can browse the menus like any
other Windows menu, by moving the mouse or you can use the
keyboard to navigate. When you get to the
right item you either click it or hit the Enter key to run its action. If the
item is a Action, Website or Mail
item the action will be called and MacroMenu will hide it self. If it is a
Clip, Keystroke Macro or Clipboard
Modifier item you activated, MacroMenu will start by
giving back the focus to the previous program, before it runs the action.
Create new items: If you right click on any item outside the
Program Menu you will get a
Popup
Menu from which you can choose to create new items or you can use the
Keyboard Shortcuts. You can also hit
F12 and use the buttons in the Main Editor.
Help: You can get help almost anywhere in the program by
hitting F1 or by clicking one of the blue question marks. The help consist of
these webpages.
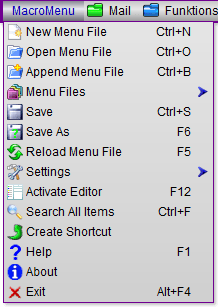
The MacroMenu drop down menu contains all the basic functionallity, that are
pretty standard for all applications, New Menu File, Open Menu File, Save and
Save Ass, so I will not say anything about those.
Append Menu File on the
other hand, is a little special, it is used on the result of another function:
Save Branch To File and it will append the
MacroMenu file that you open to the end of the existing
MacroMenu file. After appending a menu you can organize your menu using
drag and drop when MacroMenu is in edit
mode.
The
Menu Files contains a list of recently opened MacroMenu
files + the MacroMenu files that are located in the startup
folder.
Menu Settings and
Program Settings will give you access to two
dialogs where you can change the appearance of MacroMenu.
Reload Menu
File is the closest thing there is, to having undo in the MacroMenu,
as this function will reload, the current MacroMenu file
from the disk, discarding all changes made, since the file was opened or since
it was last saved.
Activate
Editor will open the main editor where you
can organize menu items by drag and drop and edit any of the items in the menu.
Search All Items is a very fast search
window where you with a few keystrokes can find any item in in the whole
menu. Create Shortcut give you a
dialog where you can create shortcuts for
MacroMenu, so it will open with a file of your choice loaded
from the start. Help will lead you to this page. In
the About dialog you can check for newer versions and
you can also register the program.
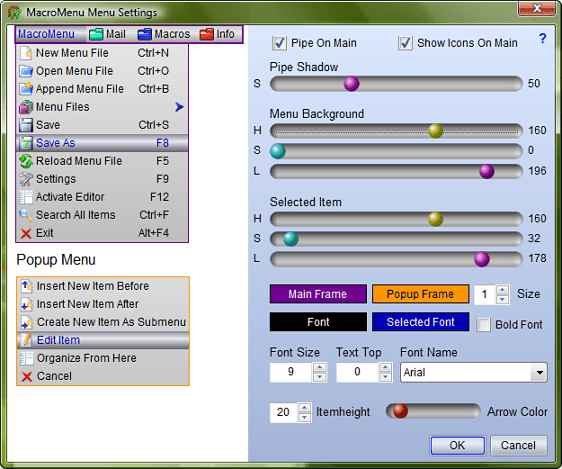
This is the dialog where you can control the colors, font and sizes of the whole
Menu system.
Pipe On Main determine whether or not the horizontal main menu
shall appear flat or rounded.
Pipe Shadow affect the selected items, as well
as the main menu, when they are rounded and it makes those more or less rounded, by
adjusting the darkness, of the shadow on the lower part.
One more thing I need
to talk about is the Text Top setting, it is used for moving the text up or down
on each menu item. Some fonts simply don't get painted at the middle, they
either end up to high or to low, so compensation is needed. The value can be
from -10 to 10, but usually a value of 1 or 2 is enough.
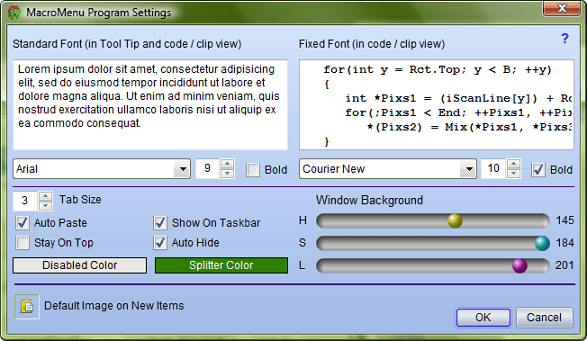
In this dialog you can change the appearance of all most everything, except the
menu it self.
If not Auto Paste is checked, you have to paste your self,
by pressing Ctrl + Insert or Ctrl + V. Focus will still be returned to the
previous app.
Show on Taskbar determine whether there is a button on the
Windows Taskbar that represent MacroMenu. There will always be an icon in the
system tray, no matter what you choose. If you chose not to Show On Taskbar, you
will occasionally see a button on the taskbar anyway and that is when you
use one of the modal windows, like this program settings dialog. While the
Program Settings are open there will be a button on the taskbar
this is to make it easier to get back to the program.
Stay On Top
can be used to make MacroMenu float on top of all other applications,
Stay On
Top have no effect when Auto Hide is checked. When
Auto Hide is checked
MacroMenu will move it self out of view whenever it looses the focus and it will
come back in to view whenever you move the mouse to the screen edge where
MacroMenu reside.
Disabled color are the color of the unused edit fields in
the editor. Splitter color is the color of all splitters and sizers, throughout
MacroMenu.

This is the dialog where you can search for items you remember that you have,
but you just don't remember where you put them.
The search start out
by searching in all items, finding those that contain the letter you typed, when
you type the second letter, the search will only look in the list of found items
from before, for every letter that you type the list gets shorter and shorter.
Term 2 can be used for an extra word and if used both
Term 1 and Term 2 must be present for the item to show
in the list.
What you write in the Term 1 and 2 edits does not have to be
words or even start of words, the search functions will look in all text in all
items and it will convert both the terms and the items to lowercase, so the
search is case insensitive.
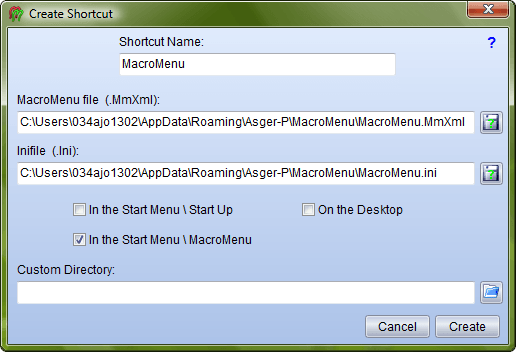
Using this dialog you can create a shortcut to MacroMenu, that
will make MacroMenu open with a certain menu file loaded without having to deal
with command line options.
MacroMenu
file and Inifile will automatically be filled with the
filenames that are currently in use, but you can change those.
If you want
MacroMenu to start automatically when you log on to the
computer you just have to check In the Start Menu \ Start Up.
MacroMenu in edit mode have 7 different
appearances, that you can see here below, they all correspond with a certain
Menu Item type. The left part is the same no matter what item type is in the
editor.
All to the left there are two button groups the eight buttons at the
top relate to the MacroMenu file and correspond with the items
in the Program Menu. The buttons in the three + one
group, all relate to Items in the menu, the first three crate items Above, As
Submenu and Below the selected item. The last one delete the selected item. All
the buttons have hints that tell you what they do and what the corresponding
keyboard shortcut is.
The drop down box at the top show the name of the
MacroMenu file that is currently loaded and if you click it you
will see a list of recently used and available files, just like in
Menu Files.
The tree view contains all items
in the file in a tree structure corresponding to the menu structure in the menu.
You can organize the items in the tree view by using drag and drop. When you are
dragging an item and you hover over an other item, with sub items, for a few
seconds, this item will open, so you get access to dropping our item in the sub
items.
If you have an empty folder item and you want to drop
another item into that empty folder as a sub item, you will have to create a
dummy sub item first, because when you drop the dropped item will always be
inserted in front of the item you drop on.
The functionality of the right side of the Main
Editor, along with the six different item types, will be explained in
the six sections here below.
You can activate the editor in several different ways, you can:
Right-Click and use the popup, you can hit F12, you
can do it from the MacroMenu menu or you can Double-Click
the Main Menu.
To get back to the Menu View, you can
use: F12 or you can Double-Click the
Title Bar.
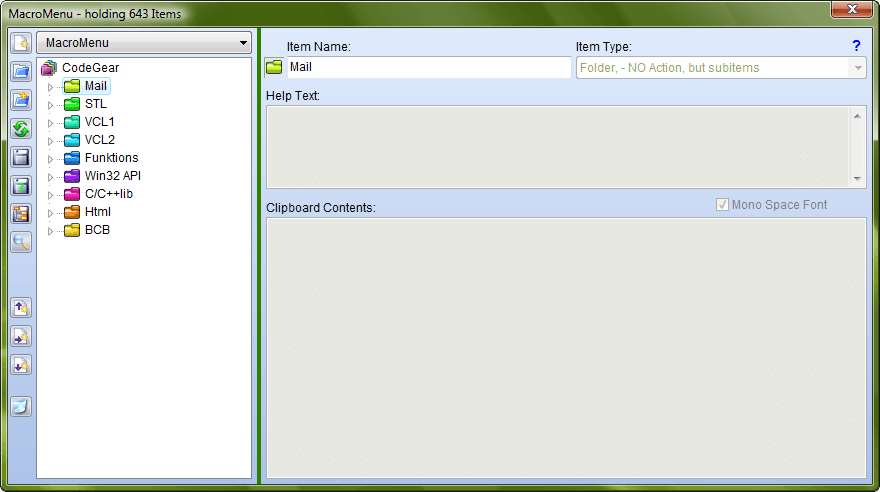
There are two kind of folder items, the ones that have no action and the ones that are still active as items, the first one is the one you see above. The main menu items are automatically that kind of inactive items. The reason for this, is that you have to click one of the main menu items, to start exploring the menu, so these items have to be inactive when clicked. The Name property and the Image are the only things that you set on this type of item, those two works the same on all items. To change the image you just click the image, when you do that you will see an Image Selection Dialog.
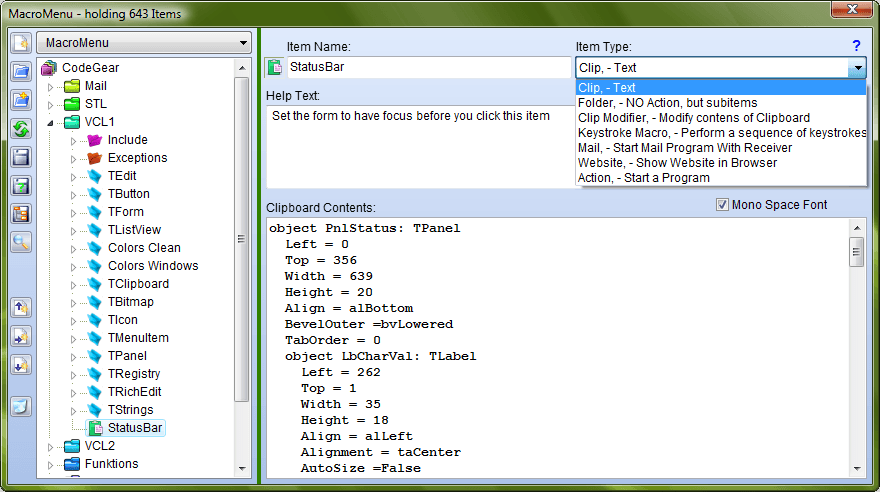
This is the oldest item type, it has been there since the first version in 1998.
The idea is that you have a piece of text you use more then once. As a
programmer it could be a function, as a secretary it could be a full company
signature or a law paragraph or
as a helpdesk worker it could be a common answer. This piece of text you paste
into the Clipboard Contents text field. If you need to give
directions on how to use this piece of text you write them in the Help
Text field. In the Item Name field you provide the
text that will be seen when you browse the menu.
The next time you need the
text, you just position the cursor in your editor, then you go to
MacroMenu and click the item and woola - focus goes back to your editor
and the text is automatically pasted into your editor at cursor position.
The
Clip Item is the default item and the first item in the drop
down box you can see up to the right, when you don't want a Clip Item
you will have to chose the type in that drop down.
As
a little invisible extra feature there is drag and drop enabled on Clip
Items, this means that you can drag one or more files onto the right
side section and drop them, then all the filenames will be inserted as the
Clipboard Contents and if you hold down the Ctrl
key, the filenames will be added instead.
Note: If you are
storing VCL templates, you must make sure that there is no
empty lines at the end of the Clipboard Contents. If you use
the Ctrl + New Item, MacroMenu will take care of
this for you.
When Clicked: Clipboard Contents is copied to the System
Clipboard.
When Ctrl + Clicked: Help Text is copied to
the System Clipboard.
When Ctrl + Shift + Clicked: Name +
Help Text + Clipboard Contents are copied to the System Clipboard.
And Pasted
in previous app if Auto Paste is on
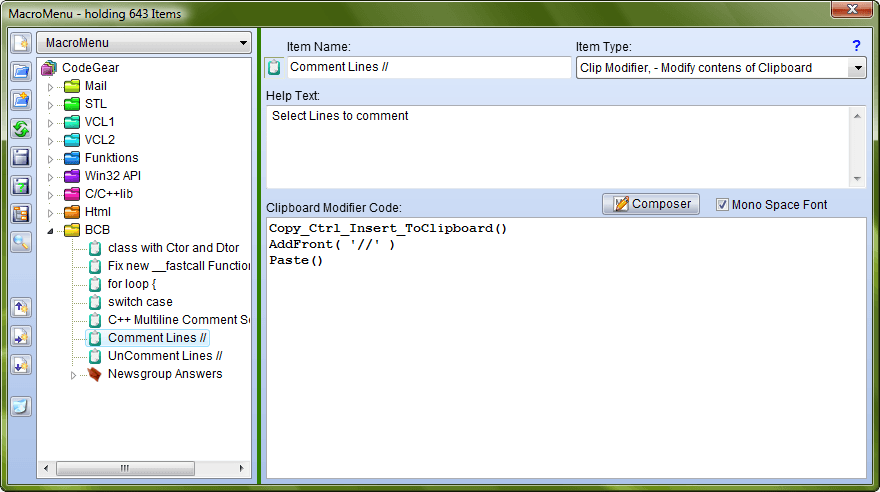
Select: Clip Modifier, - Modify contens of Clipboard. In
the Item Type drop down box.
You can modify the contents of the clipboard with this type of
items, you do it by using a set of 50+ premade function. For a full description
of all the functions and how to use them go to
ClipModifier Composer.
You can edit in the Clipboard Modifier
Code if you want.
When Clicked: Focus is set to the previous app and the
Clipboard Modifier is
run.
When Ctrl + Clicked: Clipboard Modifier code is copied to
the System Clipboard.
And Pasted in previous app if Auto Paste is on
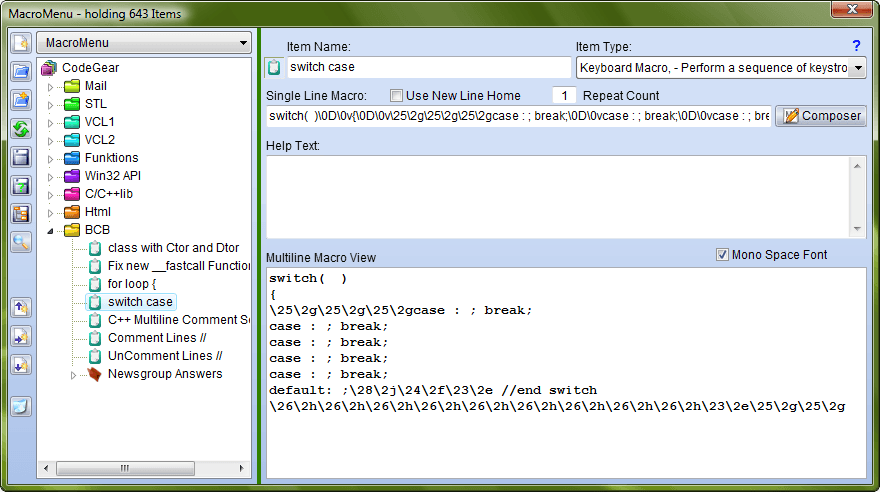
Select: Keystroke Macro, - Perform a sequence of keystrokes.
In the Item Type drop down box.
This Item type can simulate keyboard keystrokes, but the best thing it is that
you can combine keystrokes with ordinary text, into some very complex macro
templates. You don't have to know all the special keyboard codes you can just
use the Macro Composer.
You can however edit
the code directly in the item editor, so here is a little description of what
you see above: At the second line you see the Single Line Macro field where the macro
is shown as one long line, all line breaks are shown as \0D\0v
pairs and if Use new line home is checked they are followed by
\24\2f
pair which is the same as hitting the Home key. In the
Multiline Macro View you will see the line break pairs \0D\0v
represented as line breaks and you won't see the Home pairs either, unless they
are used in the code by you.
Use new line home is read
only and if you want to change its value you will have to use the
Composer, the Repeat Count
determine how many times the macro is run when you click it.
For a full
description of what this item can do go to Macro
Composer.
When Clicked: Focus is set to the previous app and the macro is
run.
When Ctrl + Clicked: Macro code is copied to
the System Clipboard.
And Pasted in previous app if Auto Paste is on

Select: Mail, - Start Mail Program With Receiver. In the
Item Type drop down box.
With Mail Items you can create individual mail templates,
with both start and signature, for all your contacts. You can also create
templates containing many receivers. When you click a Mail Item
your mail program will be started or activated and the contents of all the
fields will be send to the program.
NOTE: Mail item only
work with a dedicated mail program. It does NOT work if you only use Web mail.
When Clicked: Mail program is opened with template.
When Ctrl + Clicked: Email Address is copied to
the System Clipboard.
And Pasted in previous app if Auto Paste is on
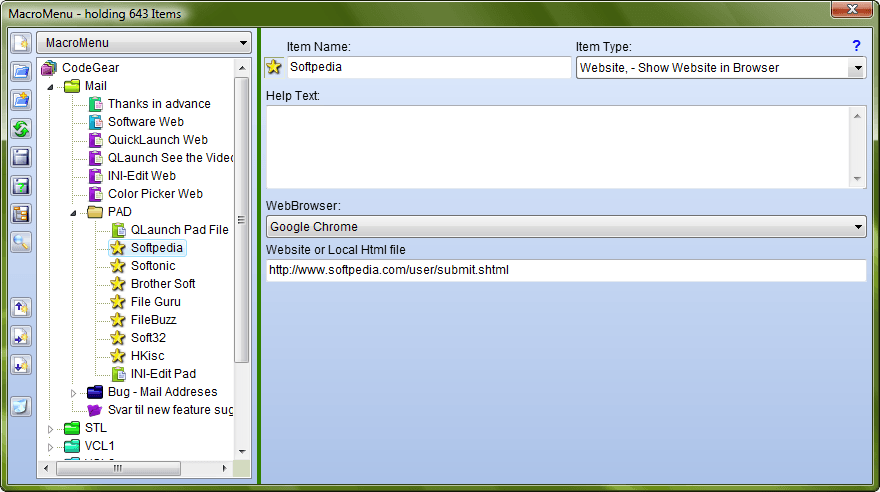
Select: Website, - Show Website in Browser. In the
Item Type drop down box.
This item is for storing bookmarks to websites or to local html files or in fact
to any kind of file type that your browser can handle. You just paste or type in
the url into the Website or Local Html file field, select the
browser you want if any, if you don't want a particular browser, you just select
the Default Browser item in the dropdown box.
If you chose a
local file of a type that your browser don't usually open, you will have to
chose a browser otherwise the file will be opened by the default program.
When Clicked: Website or local html is opened in Browser.
When Ctrl + Clicked: Website link is copied to
the System Clipboard.
And Pasted in previous app if Auto Paste is on
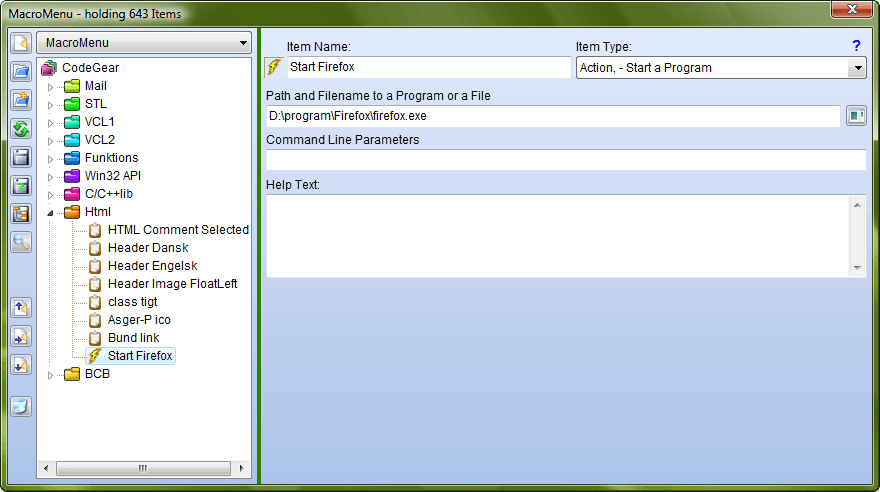
Select: Action, - Start a Program In the Item Type
drop down box.
This type of item can be used to start programs and open files. You can either
browse for a program or you can use drag and drop. When you use drag and drop,
then the first file with the extension .exe will be written to the Path
and Filename to a Program or a File field, the rest of the dropped
files will be added to the Command Line Parameters field
surrounded with quotes and spaces in between.
When Clicked: Program is started or file or folder is opened.
When Ctrl + Clicked: Path
and Filename to a Program or a File + Command Line Parameters are copied to
the System Clipboard. And Pasted in previous app if Auto Paste is on
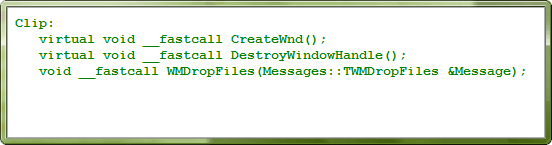
If you hold down Ctrl, when you hover over the items in the MacroMenu, you will see a window like this, whenever there is an active, not empty, item underneath the mouse cursor. The window will contain the contents of the item beneath as a preview.
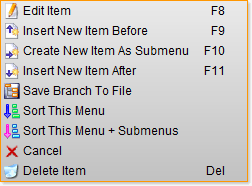
Edit Item will simply open the Editor with the active item selected.
The next three will all create a new MacroMenu Item and then
Edit Item will be
called on that new Item opening the editor with the new item selected.
There is a little
Auto Paste trick to these three function, whether you call them from the popup
menu or you use their shortcuts, doesn't matter, but if you hold down Ctrl when you call one of these
functions MacroMenu will try to determine the menu item type from what is in the
clipboard. If clipboard contents is only one line and an '@' is found, Mail is
chosen and the contents of the clipboard is copied to the To field. If a '\' is found,
then Action is chosen and the contents is copied to the Path and
Filename to a Program or a File field. If 'http' is found then Web is
chosen and the contents is copied to the Website or Local Html file field. If none of the above is found,
then Clip item is chosen and the contents of the clipboard is copied to the
Clipboard Contents field.
Save Branch To File makes it possible to share only a part of
your menu with friends and coworkers, by saving a folder / branch and its
contents to a separate file. This new file can then be added to one of your
other menu files by using Append Menu File in the
MacroMenu main menu.
Sort This Menu and
Sort This Menu + Submenus will both sort the menu items
alphabetically, in the menu that contains the item that was clicked. The last
one will also sort all submenus as well. If you hold down Shift
while you click one of the sort items, the sort will be done descending so that
B will be put before A
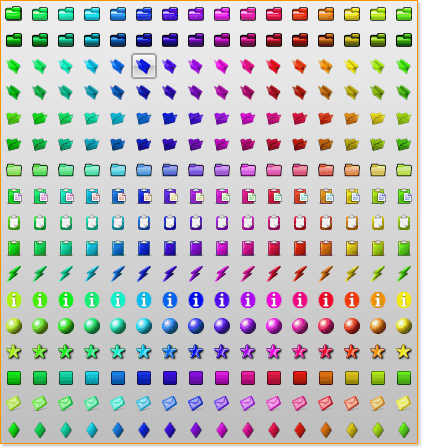
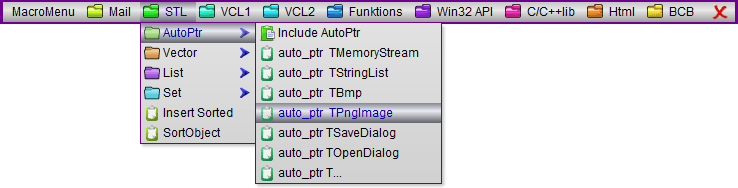
Here to the right you see the popup dialog you get if you right-click on one of
the images in the MacroMenu or if you press Alt
+ S while an item is highlighted.
You can navigate this menu with
the Arrow Keys and with Home, End,
Page Up, Page Down and select using Enter or you can use the mouse to
select.
You can select the same image as you selected last time by pressing
Ctrl + Enter when the popup is visible.
| Program Shortcuts | |
| Help | F1 |
| Create New Menu File | Ctrl + N |
| Open Menu File | Ctrl + O |
| Append Menu File | Ctrl + B |
| Reload Menu File | F5 |
| Save Current Menu File | Ctrl + S |
| Save Current Menu File To a New Name | F6 |
| Search All Items | Ctrl + F |
| Menu Visual Settings | F7 |
| Program Settings | F3 |
| Activate Item Editor | F12 or Double Click on Caption |
| Move the Menu Horizontal | Scroll Wheel |
| Resize the Menu at the Right End | Ctrl + Scroll Wheel |
| Resize the Menu at Both Ends | Ctrl + Shift + Scroll Wheel |
| Exit MacroMenu | Alt + F4 |
| Repeat Last Action ** | Ctrl + Enter or Ctrl + Q |
| Item Shortcuts |
|
| Edit Highlighted Item | F8 |
| Add New Item Before Highlighted Item | F9 |
| Add New Item Before Highlighted Item With Auto Paste | Ctrl + F9 |
| Add New Item as Submenu to Highlighted Item | F10 |
| Add New Item as Submenu to Highlighted Item With Auto Paste | Ctrl + F10 |
| Add New Item After Highlighted Item | F11 |
| Add New Item After Highlighted Item With Auto Paste | Ctrl + F11 |
| Delete the Highlighted Item | Del |
| Delete the Highlighted Item No Questions Asked | Shift + Del |
| Open Item Image Selection Popup | Alt + S |
| Open Item Popup Menu | Menu or Shift + F10 |
| Close Menu | Escape |
| Main Menu Navigation Shortcuts |
|
| Move right | Right Arrow |
| Move Left | Left Arrow |
| Move to an Item | 1 to 9 and A to Z |
| Move down to submenu | Down Arrow |
| Submenu Navigation Shortcuts |
|
| Move Down | Down Arrow |
| Move Up | Up Arrow |
| Move to last item | Page Down |
| Move to first item | Page Up |
| Move to an Item | 1 to 9 and A to Z |
| Move to submenu | Right Arrow |
| Move to parent menu | Left Arrow |
| Run Item Action | Enter |
| Special Shortcuts |
|
| Open folder of a MacroMenu data file | Ctrl + Click on a Menu File |
| Reload MRU list | Click on 'Menu Files' |
| Preview contents of item | Ctrl + navigate |
| Descending sort | Shift + Click in popup |
There are only a few command line options and they are:
-i followed closely by the full path and file name to the ini setup file, the path MUST exist, but the file don't have to as it will be created the first time you close MacroMenu.
-n followed closely by a name, default this is MacroMenu. Setting this one will have no effect if it is used at the same time as -i. The name must not contain any illegal path characters, because it will be used for file names if they are not supplied, if it does they will be removed automatically.
-p followed closely by a full path to a directory where you
want MacroMenu to look for data files, this could be a place on the intranet
where you keep common MacroMenu data files. The directory MUST exist.
The directory supplied here might also be used for the ini file if the is no
-i parameter supplied.
-m followed closely by the full path and file name to the MacroMenu file you want to load each time the program starts, if this parameter isn't set MacroMenu will start with the file that was open when it closed.
The intension is that you either use -i or you use -n and -p. It is however enough to use one
Some programs like Microsoft Expression Web 4 have their editor embedded in a larger program surface and does not automatically set focus to the editor again when activated. Most programs like this have keyboard shortcut that will activate the editor, Microsoft Expression Web 4 uses F6 to activate the editor, this means that if you start macros with F6 they will be inserted into the editor..


![]()
Last updated: Jun-28-2022 © Copyright 2003-2022 Asger-P Software
This kind of program goes by many names: macro menu, macro player, macro generator, macro organizer, macro saver, phrase automation, phrase paste, phrase express, phrase reuse, phrase copy.